Installation Day on a Vancouver Metal Stair: How a Shop Crew Lands It
Custom steel stair installation in Vancouver: what happens from site prep through final torque check, and where the schedule risks live on delivery day.
An install day on a custom steel stair is a series of small decisions made in the right order. The order is what separates a one-day install from a three-day rebuild.
The installation day is the day everyone with a stake in the project watches closely. The drawings have been settled for months. The steel has been cut, welded, and finished. The opening has been waiting. The day either ends with a stair plumb, level, bolted, and ready for the railing, or it ends with a list of follow-up items and a delivery truck that has to come back. Which one happens is mostly decided before the truck leaves the shop.
This post walks through how a Vancouver Stairs install day actually runs from start to finish, what the GC and homeowner should expect, and the small decisions that separate a clean install from a difficult one.
Two days before — the last measurement
Forty-eight hours before delivery, our shop foreman calls the GC for the final pre-install check. The questions are short and specific. Is the opening framed to the dimension on the shop drawings? Is the upper landing supported by the structural backup the engineer specified? Is the finish flooring on either floor at the elevation the drawings assumed, or has it changed? Is the path from the front door, through the house, to the install location clear of obstructions, finished surfaces that need protection, and other trades?
If any of those are not confirmed, the install moves. We do not load a finished stair into a truck on the assumption the site will be ready. Loading and unloading the stair twice is more expensive than waiting a day.
This is also when we confirm the staging area. A custom stair is awkward to handle — long pieces, finished surfaces, painted edges that are not forgiving. We stage on cardboard or moving blankets, never directly on a finished floor or driveway.
Install day — site prep before the truck
The crew arrives on site before the truck. The first hour is preparation. Floor protection goes down along the route from the door to the install location and around the opening. The opening is checked one last time with a tape — width, length, plumb, level on the lower floor, level on the upper floor. The upper landing edge is checked for the bolt or weld pattern the shop drawings called for. If the foreman finds a surprise, this is the time to call the architect or engineer, not after the stair is out of the truck.
We bring more material than the install requires. Shims, hardware, an extra bag of bolts in every common size, isolation pads, sealant. The site is not the place to drive back to the shop for a bolt that was on the list but not in the toolbox.
The delivery and the rigging
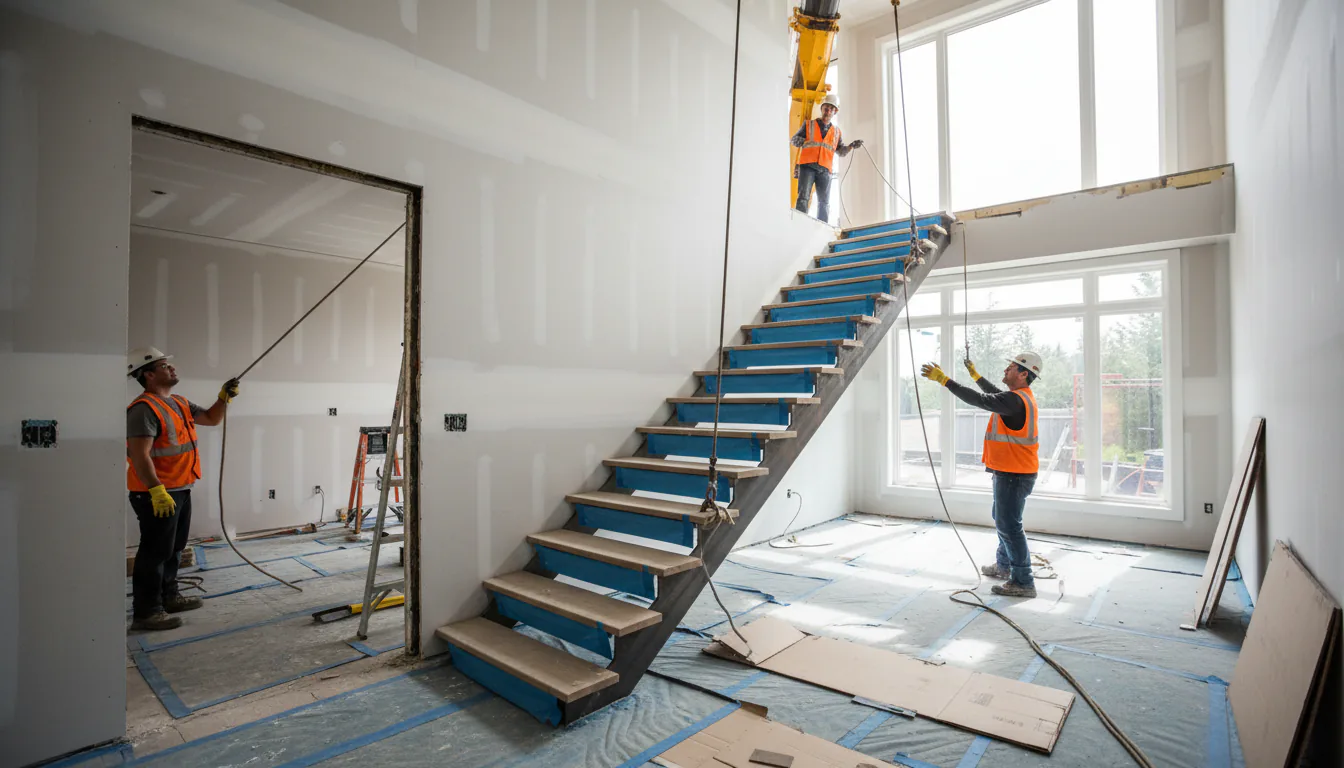
The truck arrives mid-morning on most projects. A mono stringer for a single-flight residential stair is one main piece plus brackets and treads; a switchback stair can be three or four major assemblies. The pieces are off-loaded onto the protected staging area and inspected for shipping damage before the truck leaves. A bend or scratch caught at delivery is fixable; one caught after install is a remedial trip.
Rigging a stair into a residential interior is the part of the day that needs the most planning. A long stringer rarely goes straight through a front door. The path often involves rotation through a vestibule, a tip up a flight to the second floor opening, and a controlled lower into the opening. We pre-plan the path with the foreman before the delivery; we do not improvise it with a piece of steel suspended on a strap.
On houses with no good path through the interior — usually a stair that lands deep in a long floor plan — the install may need a crane lift through a window opening that has not been glazed yet, or an external lift over a deck. That decision is made weeks before, not on the day, because it involves a crane booking and a window glazing schedule.
Setting the stair plumb and level
With the main piece in the opening, the foreman levels and plumbs the structure before any bolts are tightened. The base plate sits on the lower floor with shim packs at every bolt; the top connection meets the upper floor framing on a fabricated landing seat. The two are adjusted together until the rise per tread is consistent from bottom to top and the run from bottom to top matches the opening dimension.
Shim packs are not improvisation. They are sized to the published tolerances of the structural drawing and are placed in patterns that distribute load evenly. A stair that looks plumb but rests on a single shim under one corner of the base plate will settle in service and the user will feel the difference. We use enough shims to fully support the plate, then grout solid if the engineer specified.
This is also where the isolation pads go in on multifamily and townhouse installs. Pads at the base plate, pads at the upper landing, isolation grommets through the bolts. Our piece on stair acoustics in Vancouver multifamily buildings covers why this matters and how it is detailed.
Bolting, torque, and the secondary structure
Once the stair is plumb, level, and the tread spacing is even, the bolts are torqued to the engineer’s specification. A bolt that is hand-tight is not structural; a bolt over-torqued can damage the plate. The torque value is on the shop drawings and the wrench is calibrated. We log the torque check on the install report.
Secondary structure — landing nosings, intermediate brackets, the connection at the upper floor framing — goes in next. If the stair has a wall-anchored cantilever element, the wall is checked for the backup the engineer specified, and the anchors are set to depth. We do not chase an anchor into a wall that is not what the drawing said. If the wall is wrong, the install stops and the architect or engineer is called.
The railing — separate scope, often separate day
The railing typically goes in after the treads, sometimes the same day for a small stair and often the following day for a larger feature stair. The railing involves more parts, more handling, and more finish-sensitive surfaces. Trying to compress railing install into the same day as stair install rushes the finish.
Posts are set first, then the top rail, then the infill (glass panels, cable runs, picket sections, or panel infill). The handrail returns are checked against the shop drawings. The bracket pattern on a wall-mounted rail meets the stud locations that were marked at framing. The glass panels go in last and are leveled in their base shoe or clamped in place per the manufacturer’s spec.
Cable railing installs end with tensioning to the manufacturer’s torque value. Tensioning before the post pattern is square produces a railing that pulls one direction or the other in service. We square the posts first, set the cables, then walk the stair and re-check.
The finish check and the punch list
Before the crew packs up, the foreman walks the stair with the GC. The walk has a checklist: every bolt visible, every bolt torqued; every weld location clean and consistent; every tread level and even; every railing connection tight; every finished surface free of marks; every isolation pad seated; every required disclosure (engineering stamp, hardware torque log, finish data sheet) handed over.
Anything that did not come out clean goes onto a written punch list. We do not leave a verbal list. The punch list moves with the project until every item is signed off, and the items that need a return trip are scheduled before we leave.
For a deeper look at the process from the shop side that feeds into install day, see our pieces on custom staircase timeline in Vancouver and the floating stair process.
What separates a clean install from a difficult one
After enough installs, the difference between a one-day install and a three-day rebuild is rarely the stair. It is the site preparation that happens before delivery. The opening that is the right dimension. The backup wall framed where the engineer drew it. The floor finish at the planned elevation. The path clear of obstructions. The GC available when a decision has to be made.
We invest more in site coordination before delivery than in the install itself, because the install is the smallest part of the cost when it goes well and the largest when it does not. A two-week head start on the site checks pays for itself on every project.
Sources
- CSA W47.1 — Certification of companies for fusion welding of steel
- Engineers and Geoscientists BC — practice resources
Related reading: the custom staircase timeline in Vancouver, the floating stair process piece, and the stair acoustics in multifamily piece.
Related questions
How long does a custom steel stair installation take?
A typical residential mono stringer or floating stair runs one to two install days for the steel and another one to two days for the railing and treads, depending on how much is pre-assembled in the shop. A larger feature stair with bolted segments and on-site finish coordination can stretch into the rest of the week. We plan the schedule with the GC before the truck leaves the shop.
Does the homeowner need to be on site?
Generally no. We coordinate access with the GC or the homeowner the day before, confirm the staging area, and run the install with our crew. The homeowner only needs to see the stair if there is a finish decision that was deferred to install day, which we try to avoid.
What can go wrong on install day?
Three things most often: the opening is not the dimension the shop drawings showed, the framing under the landing did not get the backup the structural engineer specified, or a finish floor was installed at a different elevation than the drawing. Any of those can turn a one-day install into a two-day install. We measure the site one more time before the truck loads.